How to Create a Free VPS: A Step-by-Step Guide
Creating a Virtual Private Server (VPS) for free can be a great way to host websites, run applications, or even learn more about server management without any cost. In this guide, we will walk you through the process of setting up a free VPS from scratch.
Step 1: Choose a Free VPS Provider
There are several providers that offer free VPS hosting services. Some popular options include:
- Amazon Web Services (AWS) Free Tier - AWS offers a free tier that includes 750 hours of Linux and Windows t2.micro instances each month for one year.
- Google Cloud Platform (GCP) Free Tier - GCP provides $300 in credits for new users, which can be used for VPS hosting.
- Microsoft Azure Free Account - Azure offers a 12-month free account with access to a variety of services, including VPS hosting.
- Oracle Cloud Free Tier - Oracle provides always free VPS instances with limited resources.
Step 2: Sign Up and Verify Your Account
Once you've chosen a provider, sign up for an account and complete any necessary verification steps. This often involves providing a credit card for verification, but you won't be charged as long as you stay within the free tier limits.

Step 3: Create a New VPS Instance
After your account is set up, navigate to the VPS or compute engine section of the provider's dashboard. Here, you will create a new instance:
- Select the instance type (e.g., t2.micro for AWS, f1-micro for GCP).
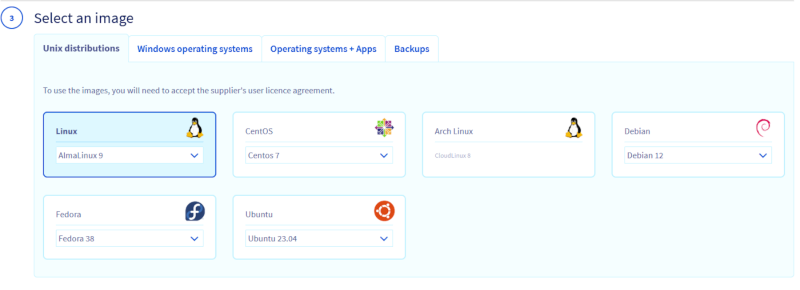
- Choose the operating system (e.g., Ubuntu, CentOS, Windows Server).
- Configure any additional settings (e.g., networking, storage).
- Click "Create" or "Launch" to start your VPS instance.
Step 4: Connect to Your VPS
Once your VPS instance is running, you need to connect to it. This is typically done using SSH (Secure Shell) for Linux instances or Remote Desktop Protocol (RDP) for Windows instances.
For Linux VPS:
- Open a terminal on your local machine.
- Use the SSH command to connect:
ssh username@your-vps-ip-address - Enter your password or passphrase if prompted.
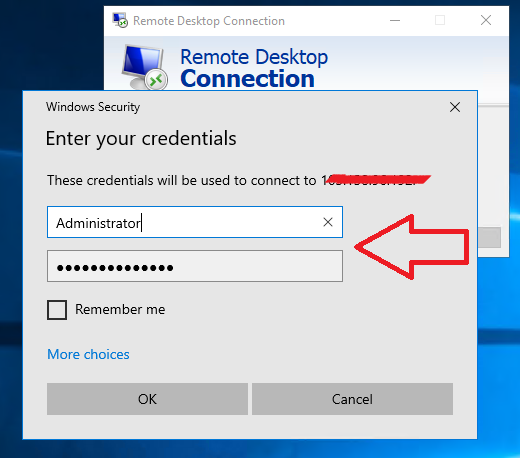
For Windows VPS:
- Open Remote Desktop Connection on your local machine.
- Enter your VPS IP address and click "Connect".
- Enter your username and password when prompted.
Step 5: Initial Configuration
Now that you are connected to your VPS, it's time to perform some initial configurations:
- Update your system packages to ensure everything is up to date. For Debian-based systems like Ubuntu, you can use the following commands:
sudo apt update && sudo apt upgrade - For CentOS or RHEL-based systems, use:
sudo yum update - Set up your preferred text editor and other essential tools. For example, to install Nano on Ubuntu:
sudo apt install nano
Step 6: Setting Up a Web Server
A common use for a VPS is to host a website. Here’s how you can set up a simple web server using Apache or Nginx:
Install Apache
- For Debian-based systems:
sudo apt install apache2 - For CentOS or RHEL-based systems:
sudo yum install httpd - Start the Apache service:
sudo systemctl start apache2
Install Nginx
- For Debian-based systems:
sudo apt install nginx - For CentOS or RHEL-based systems:
sudo yum install nginx - Start the Nginx service:
sudo systemctl start nginx
Step 7: Secure Your VPS
It's crucial to secure your VPS to prevent unauthorized access. Here are some basic steps to enhance your VPS security:
- Update your system:
sudo apt update && sudo apt upgrade(for Debian-based systems). - Set up a firewall using
ufwor similar tools. For example, to allow SSH and HTTP traffic:sudo ufw allow OpenSSH
sudo ufw allow 'Apache Full'
sudo ufw enable - Disable root login and use SSH keys for authentication. Edit the SSH configuration file:
Find the linesudo nano /etc/ssh/sshd_configPermitRootLoginand change it toPermitRootLogin no. - Install fail2ban to protect against brute-force attacks:
Start and enable the service:sudo apt install fail2bansudo systemctl start fail2ban
sudo systemctl enable fail2ban
Step 8: Monitoring and Maintenance
To ensure your VPS runs smoothly, regular monitoring and maintenance are essential. Here are some tips:
- Monitor system resource usage using tools like
top,htop, orglances. - Set up automatic backups to prevent data loss. Many VPS providers offer built-in backup solutions.
- Regularly check logs for any unusual activity. Logs can be found in the
/var/logdirectory. - Update software packages regularly to patch vulnerabilities and improve performance.

Conclusion
Congratulations! You have successfully set up a free VPS. Whether you're using it to host websites, run applications, or learn more about server management, a VPS is a powerful tool. Remember to monitor your usage to stay within the free tier limits and avoid any unexpected charges. With proper setup and maintenance, your VPS can serve as a reliable and efficient server for your needs.